
🤍WELCOME HERE🤍
This post may contain affiliate links.
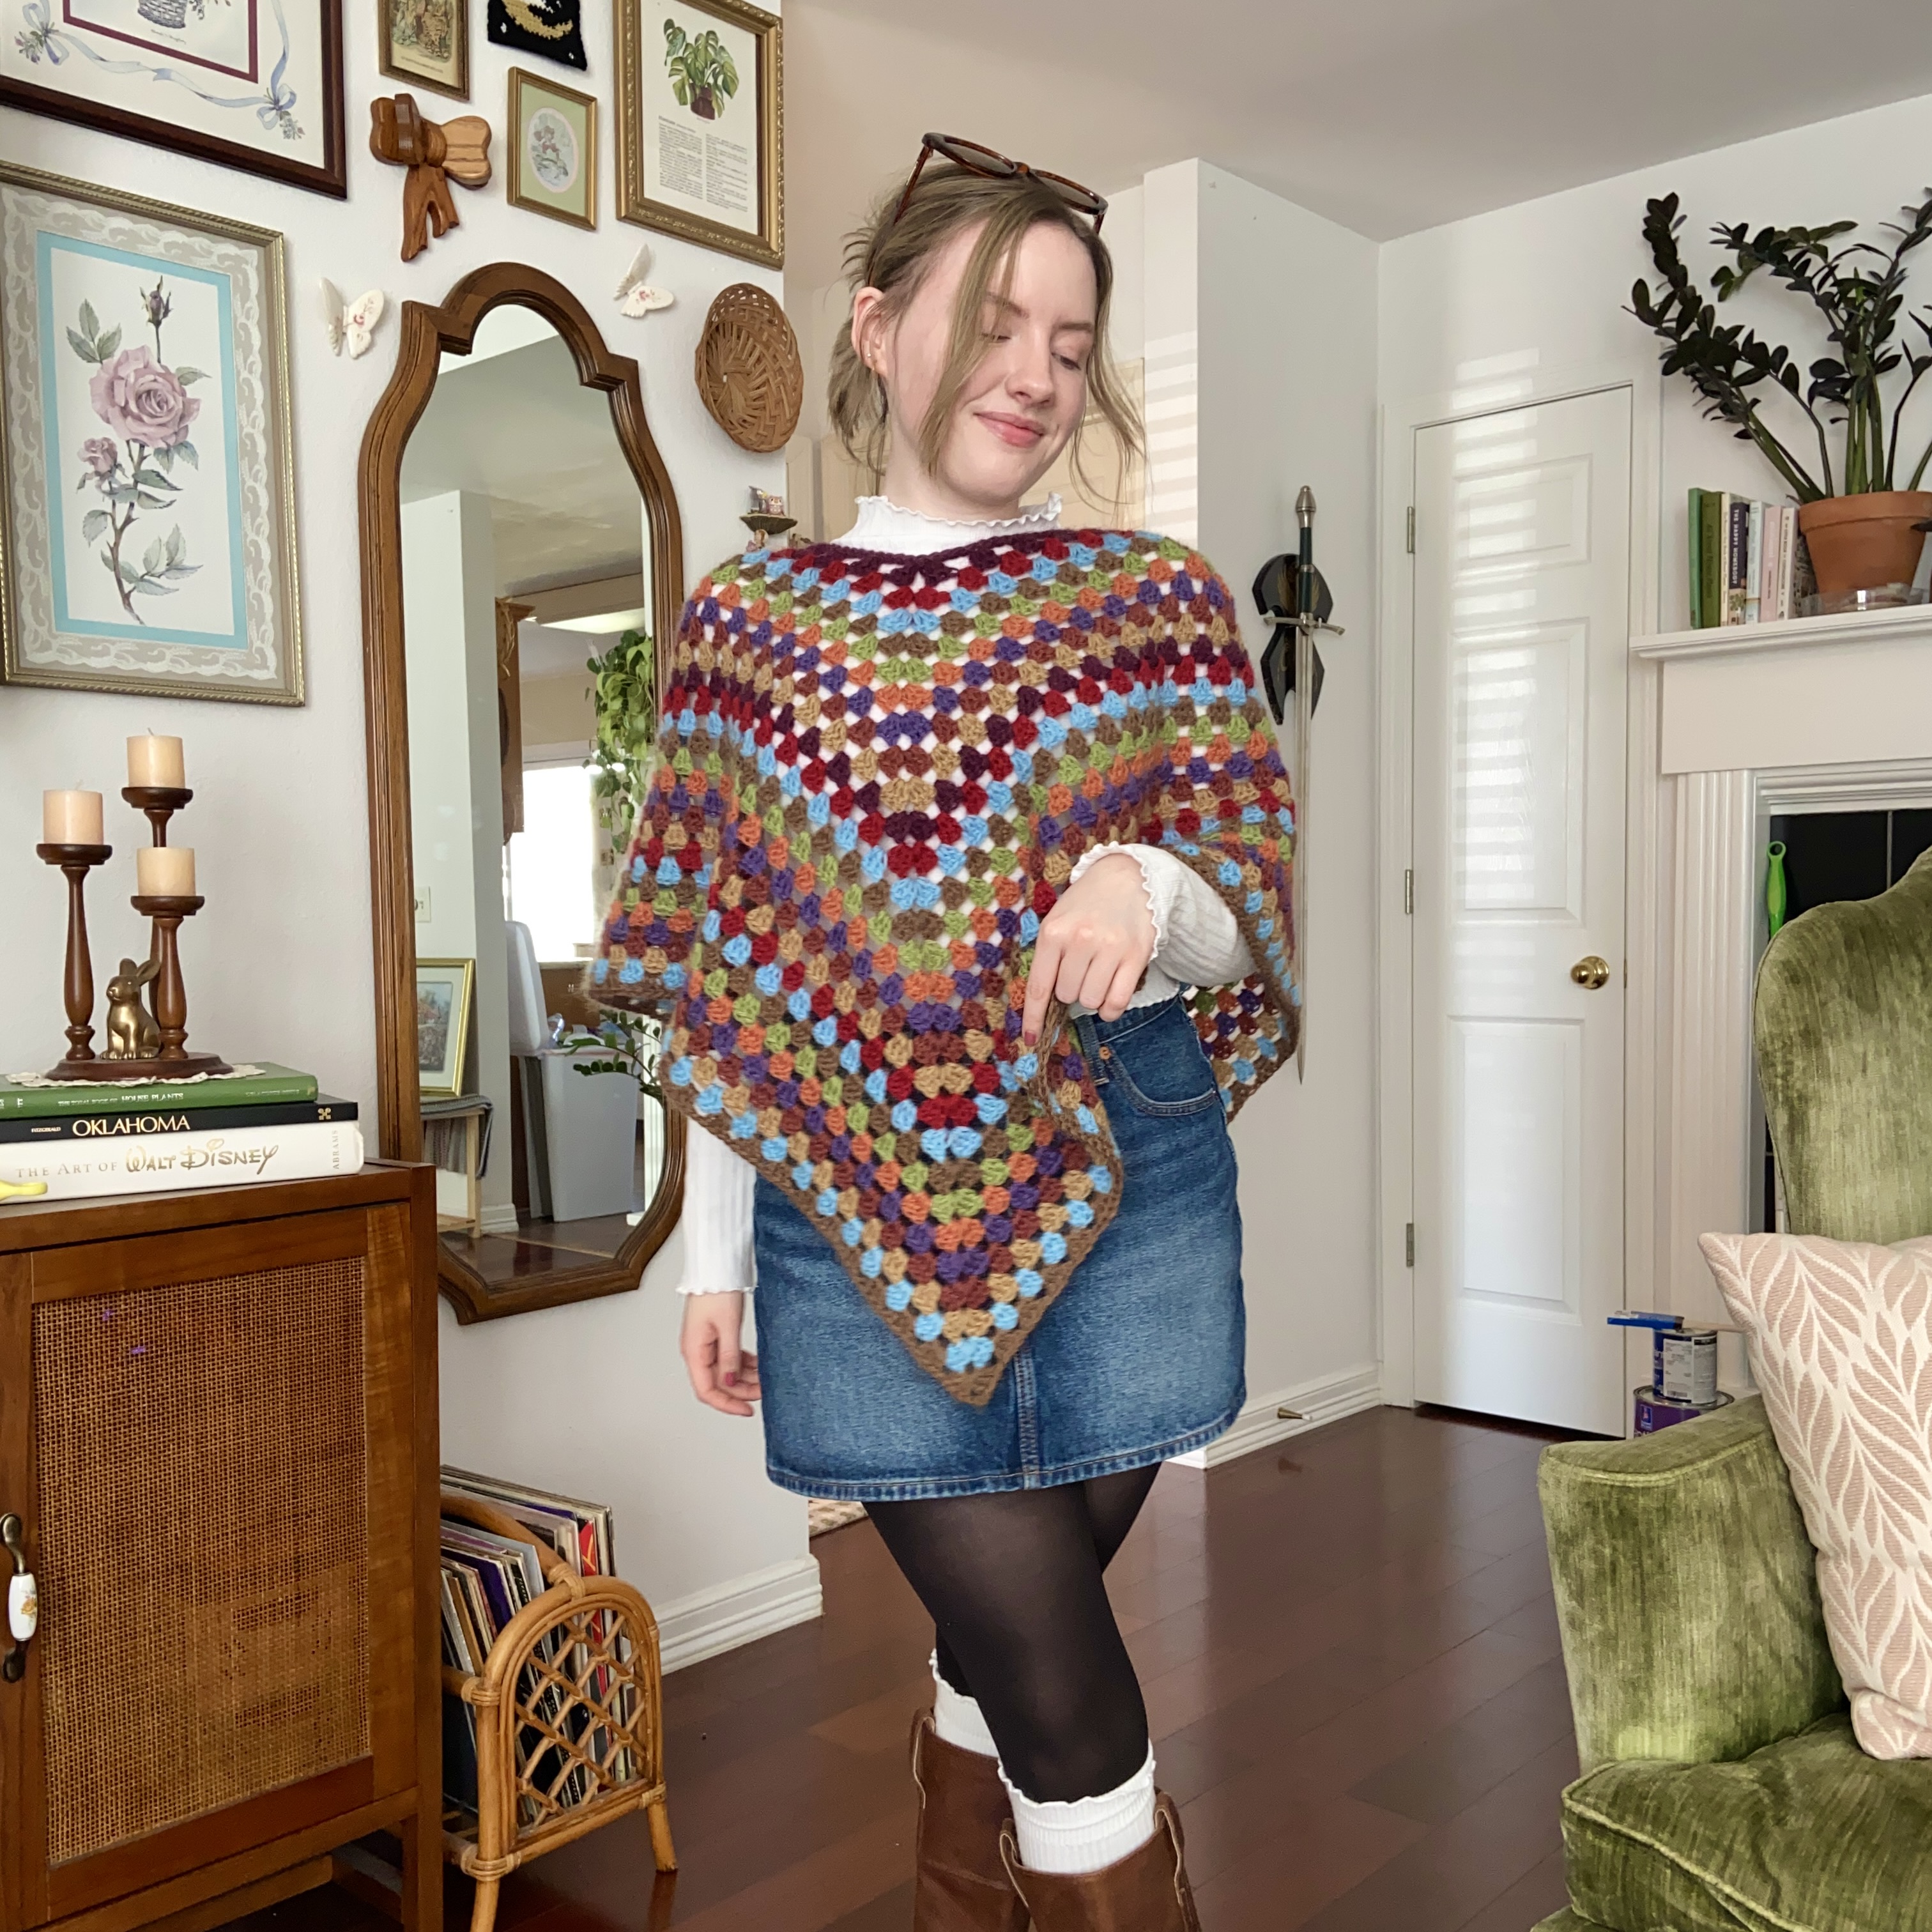
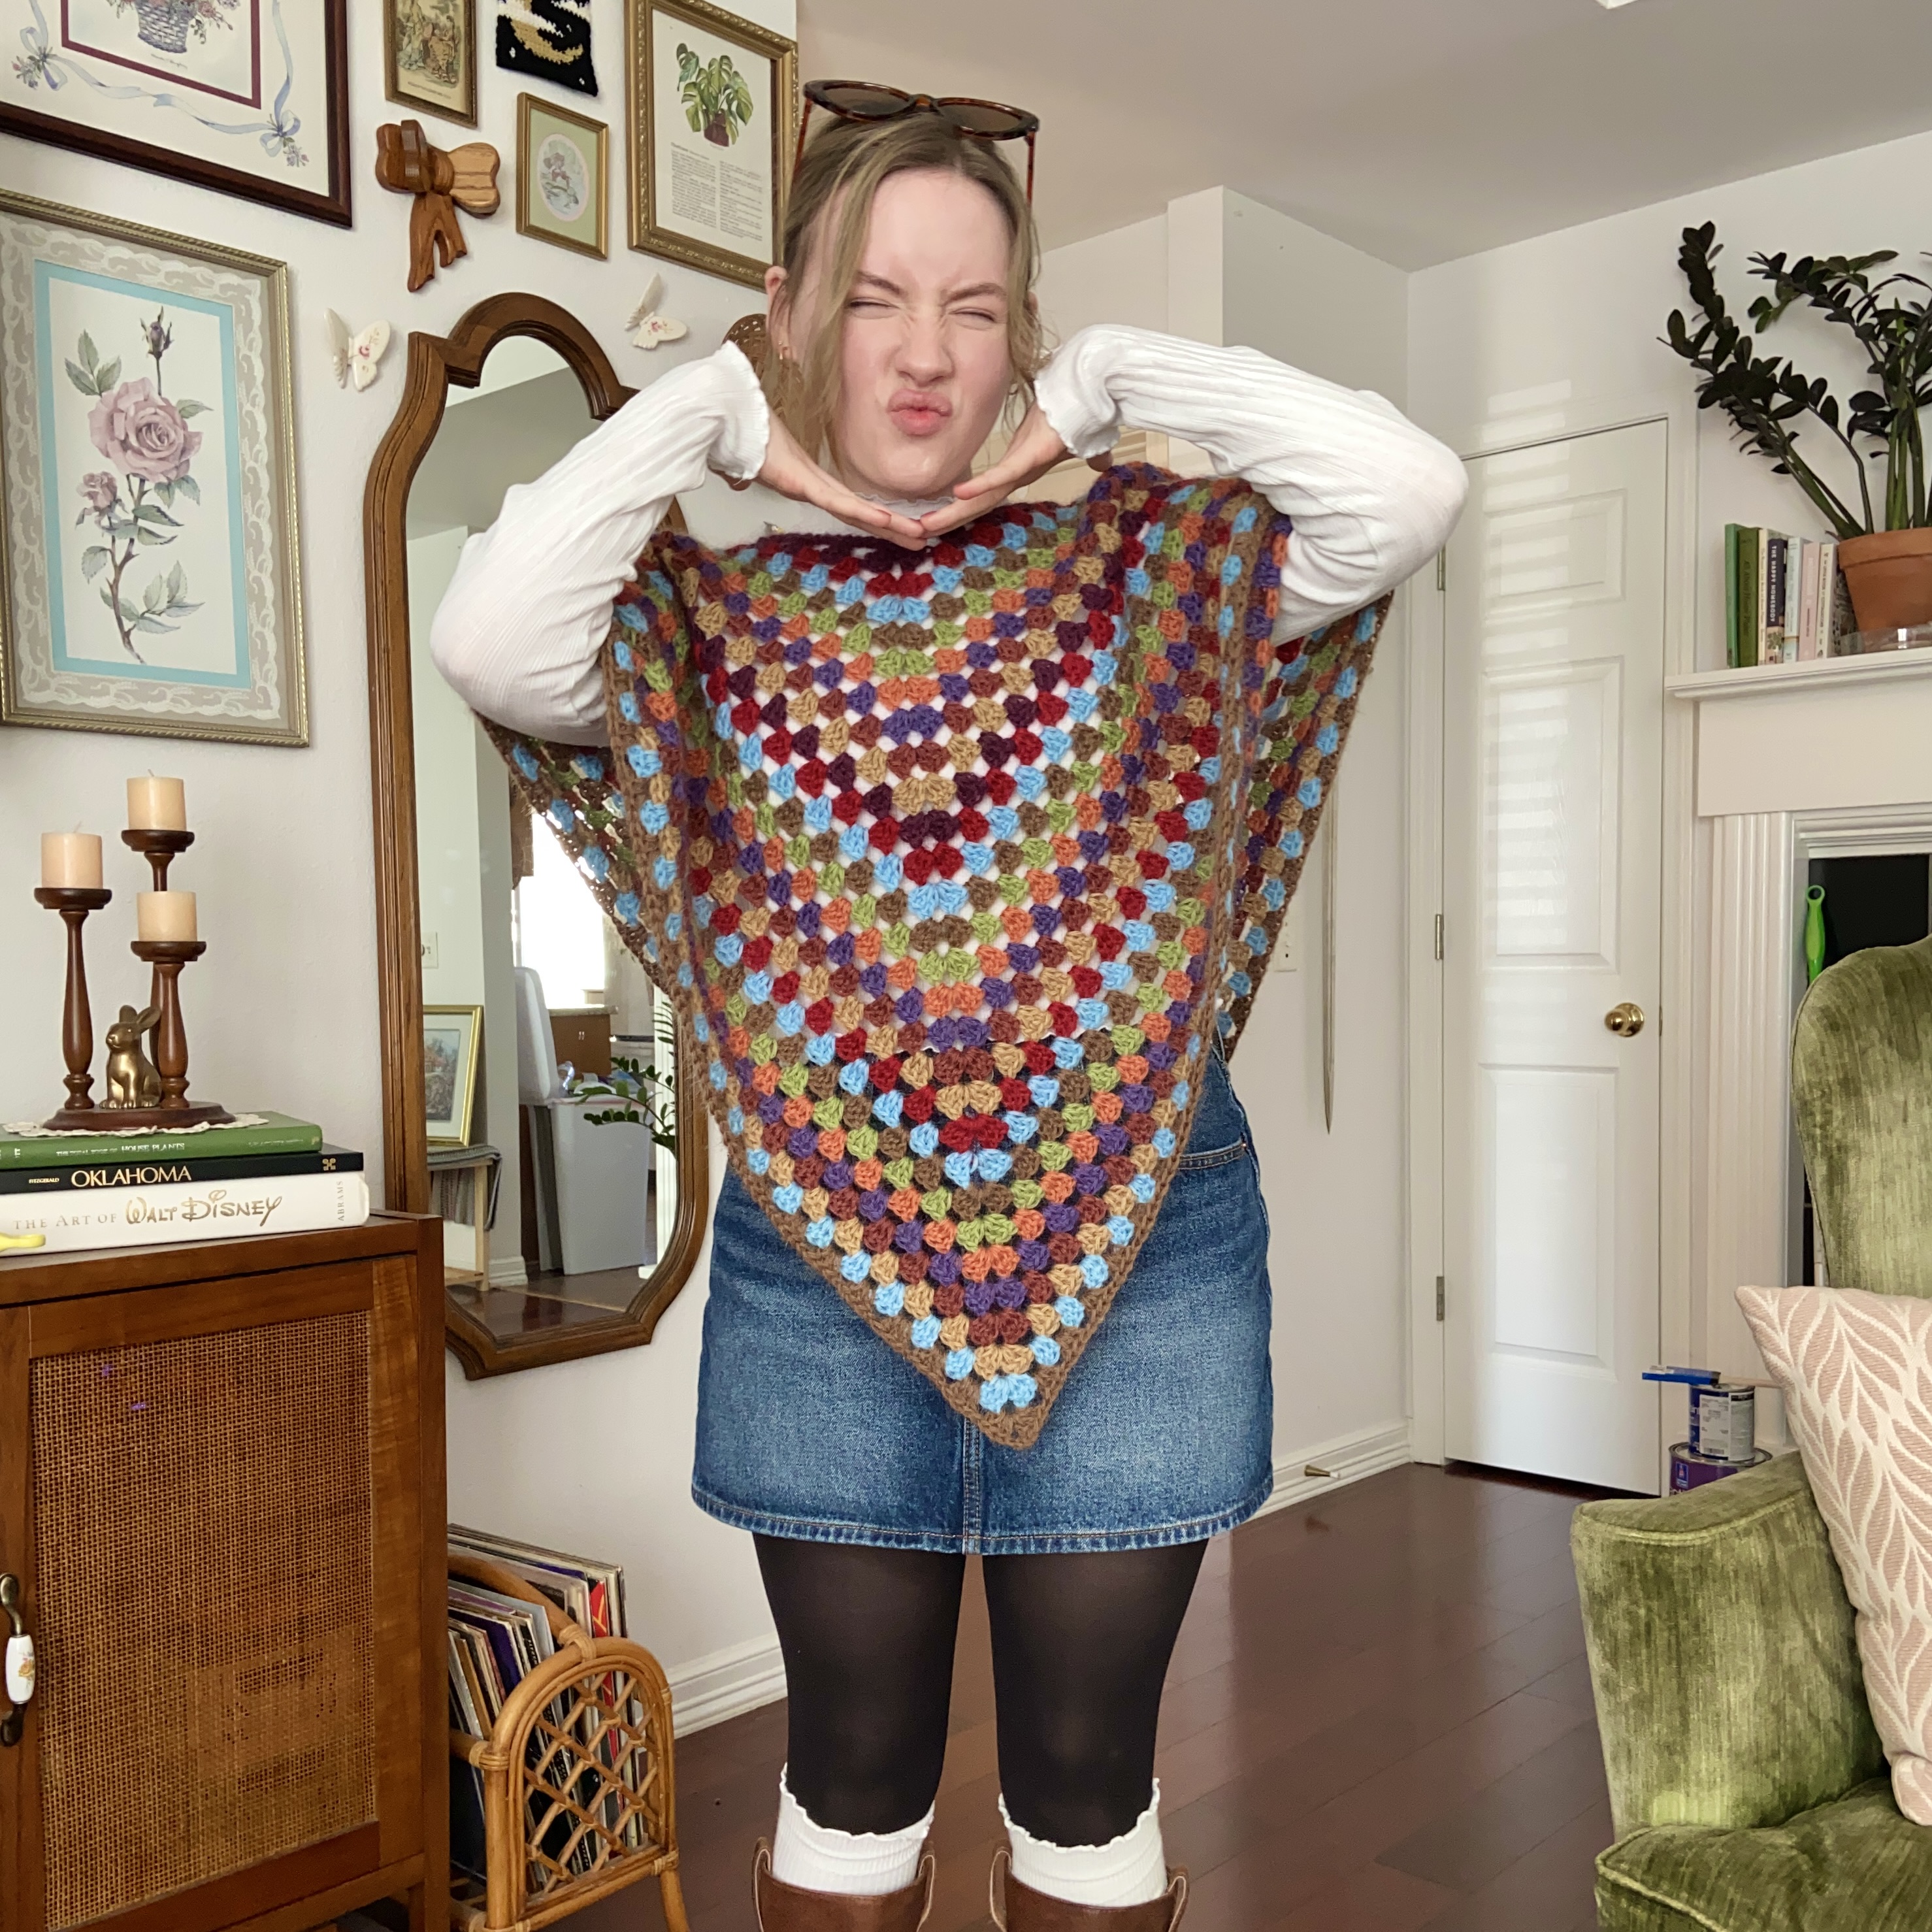
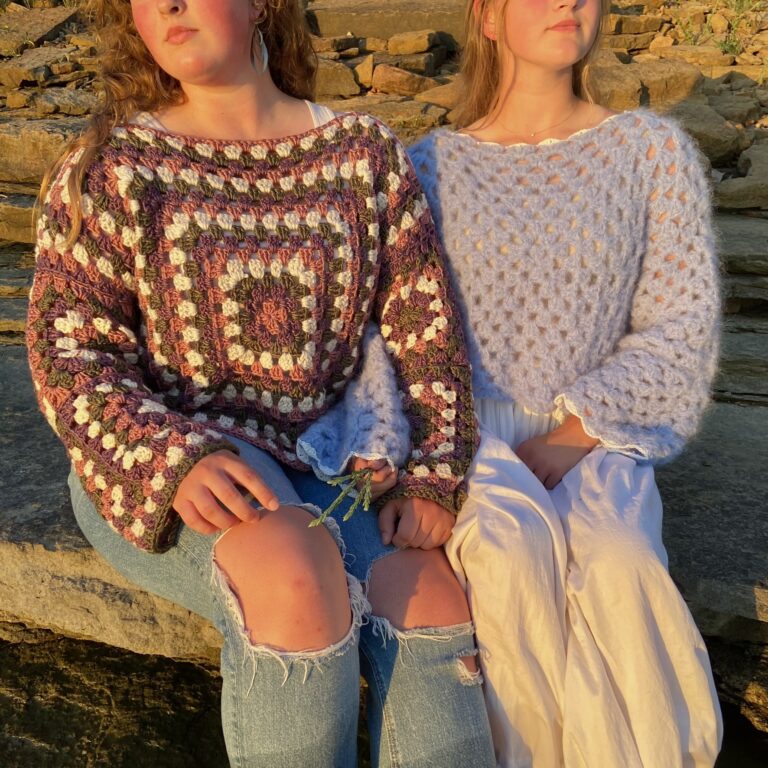
I am so beyond excited to share with you today my new design and it’s the “Winifred Poncho“ pattern!
I don’t know about you, but I have ALWAYS wanted a poncho, I have always thought that they looked so cute and cozy, so one random day I was like “hey, why don’t I just crochet myself one??” and that’s where the inspiration sparked and I got to work on this pattern we now have today! 🤭
With the design for this Poncho being fairly simple make-up, and of course including one of my favorite stitches of all time (the basic “granny square” stitch💕), it is truly the coziest, comfy garment of my dreams 😍!
Any who, enough with the yapping,
without further ado, LET’S GET STARTED!
MATERIALS
YARN – Medium Weight (4) yarn
Yarn used for full multi-color poncho
Yarn used for Tester Poncho (the pink, white and brown one)
HOOK – 6.00mm Crochet Hook
Darning Needle (my FAVES!! make seaming and weaving in ends so much easier because of the bent tip)
Stitch markers (The best! They stay in place, so you don’t have to worry about them falling out.)
Stitches + Abbreviations
St(s) = Stitch(es)
Ch = Chain
Sl st = Slip Stitch
Dc = Double Crochet
Dc Cluster = Double Crochet Cluster (3 dc worked into the same ch/ch space)
Dc Cluster Corner/Inc = Double Crochet Corner/Increase (dc cluster, ch 3, dc cluster ALL worked into the same ch/ch space)
Rnd = Round
Rep = Repeat
Pattern Notes
*This Pattern uses US crochet terms
*Ch 3 ALWAYS counts as a stitch in this pattern.
*ALWAYS Ch 1 before moving onto the next dc cluster/ch space
*Through the remainder of this pattern, you will be work in ch spaces and not in sts.
(exception for the slip stitch worked to join your round together).
MEASUREMENTS
Gauge: ” 4 x 4″ = 4 dc clusters wide by 6 dc cluster rows tall
gauge made with using the granny stripe stitch (tutorial linked)
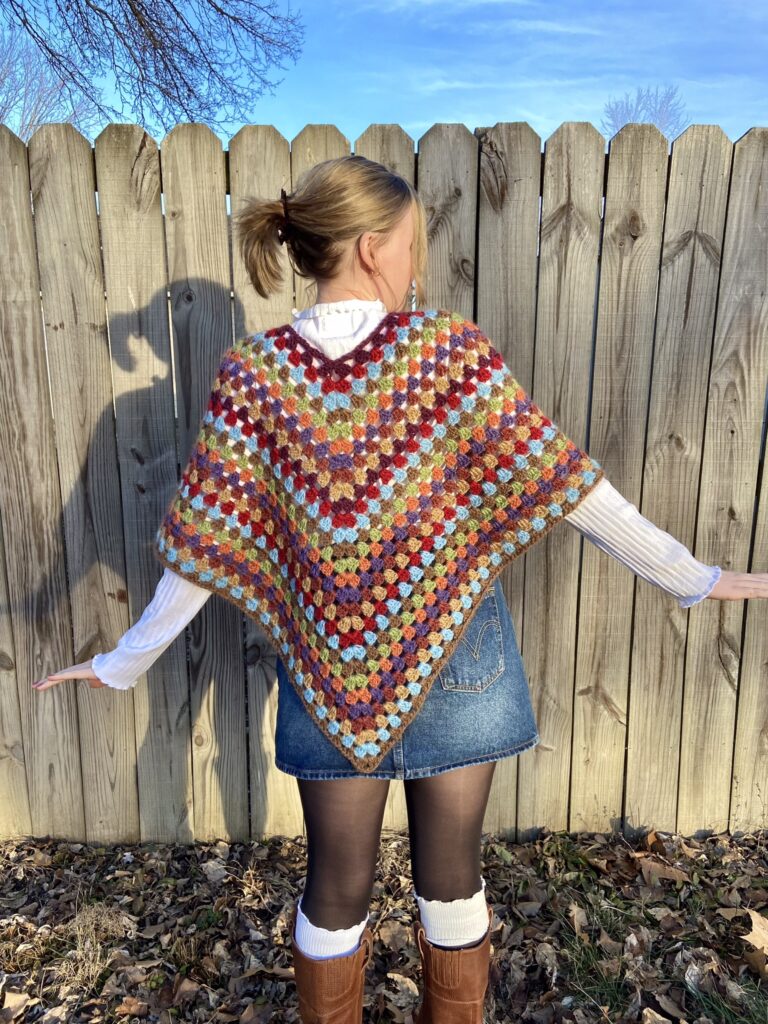
Poncho measures approx. 25 inches long from the neckline to the bottom point of the garment. But you can work as many rows as you’d like!
This is a OSFM (one size fits most) pattern
(I think it would most realistically best fit sizes XS-2XL. I’m a size S/M)
The Winifred Poncho Pattern
Ch 64 (it might not look like it at first, it should fit most every size, as long as your gauge is correct).
Rnd 1: Sl st into the first ch of your chain (make sure it isn’t twisted). You will now be working in the round.
Ch 3 (the ch 3 at the beginning of every round will ALWAYS count as the first st of the rnd throughout this pattern. And is always the first “dc” of your first dc cluster of the round).
work a dc cluster corner/inc into the first ch, *ch 1 (ALWAYS ch 1 before moving onto the next cluster), *sk 3 ch, work a dc cluster in the next ch, *rep 2 more times. Ch 1, Sk 3 ch,
*work a dc cluster corner into the next ch, ch 1, sk 3 ch,
work a dc cluster in the next, ch 1, sk 3 ch,
work a dc cluster in the next, ch 1, sk 3 ch,
work a dc cluster in the next ch 1, sk 3 ch,
*rep until the end of your ch and you have 4 dc cluster corners/increases and
12 standalone dc clusters. Sl st into the first st of the round.
(ROUND 2 IF YOU’RE NOT CHANGING COLORS)
Rnd 2: Turn your work. Ch 3, dc 2, ch 1 (this is your first dc cluster of the round.)
*Make sure after every complete dc cluster/dc cluster corner, you ALWAYS ch 1 before moving onto the next ch space.
You will now be working in ch spaces and not in the chain itself.
There are “edge” ch spaces (“edge” ch spaces are ch 1 spaces) and “corner” ch spaces (“corner ch spaces are ch 3 spaces).
You will only work 1 dc cluster into every “edge” ch space you come across and will be working a dc cluster corner/inc into every “corner” ch space you come across (ALWAYS ch 1 before moving onto the next ch space)
Please refer to picture shown below
Continue working in every ch space until the end of the round. Sl st into the first st of the round.
(ROUND 2 IF YOU ARE CHANGING COLORS)
Fasten off your yarn and grab your next color.
check out my YouTube Tutorial Here for this part to see how I work over my ends so I don’t have to weave them all in at the end of for project!
Rnd 2: Turn your work. Insert your hook into the closest corner where you previously sl st into to join the rnd and pull through your new yarn color.
Ch 3, work 2 dc in ch space, ch 3 and work 1 dc cluster into same ch space, ch 1 (this is your first dc cluster corner/inc of the rnd).
You will now be working in ch spaces and not in the chain itself.
There are “edge” ch spaces (“edge” ch spaces are ch 1 spaces) and “corner” ch spaces (“corner ch spaces are ch 3 spaces).
You will only work 1 dc cluster into every “edge” ch space you come across and will be working a dc cluster corner/inc into every “corner” ch space you come across (ALWAYS ch 1 before moving onto the next ch space)
Please refer to picture shown below.
Continue working in every ch space until the end of the round. Sl st into the first st of the round.

(ROUND 3-6 IF YOU ARE NOT CHANGING COLORS)
Rnds 3-6: Turn your work. Ch 3, dc 2, ch 1 (this is your first dc cluster of the round.)
Work 1 dc cluster into every “edge”/ch 1 space and work a dc cluster corner/inc into every “corner”/ch 3 space
Continue working in every ch space until the end of the round. Sl st into the first st of the round.
(ROUND 3-6 IF YOU ARE CHANGING COLORS)
Fasten off your yarn and grab your next color.
Rnds 3-6: Turn your work. Insert your hook into the closest corner where you previously sl st into to join the rnd and pull through your new yarn color.
Ch 3, work 2 dc in ch space, ch 3 and work 1 dc cluster into same ch space, ch 1 (this is your first dc cluster corner/inc of the rnd).
Work 1 dc cluster into every “edge”/ch 1 space and work a dc cluster corner/inc into every “corner”/ch 3 space
Continue working in every ch space until the end of the round. Sl st into the first st of the round.
Fasten off your yarn and grab your next color.
(this part and the start of round 7 is irrelevant to you if you are not changing colors, you will be starting on a norm dc cluster and not a dc corner/inc)
Rnd 7: Turn your work. Insert your hook into the closest corner where you previously sl st into to join the rnd and pull through your new yarn color.
Ch 3, work 2 dc in ch space, ch 3 and work 1 dc cluster into same ch space, ch 1 (this is your first dc cluster corner/inc of the rnd).
Video tutorial AVAILABLE HERE if you need better help visualizing the process!
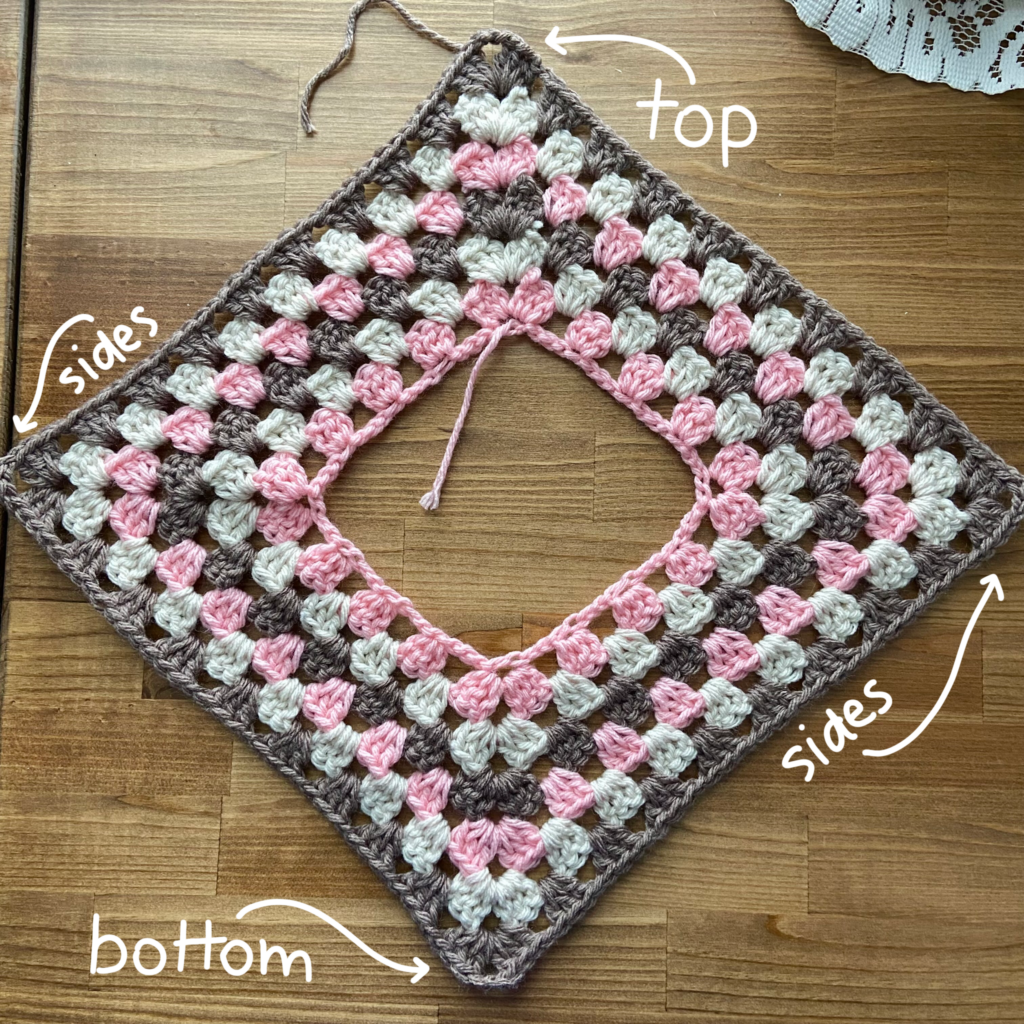
You will only be keeping/increasing 2 of the 4 corners you have. If you look at the picture shown above, there are “top” and “bottom” corners and “side” corners.
You will ONLY be continuing to increase in the top & bottom corners and WILL NOT be increasing in the side corners, instead you will be only work 1 dc cluster into those side corners when you come across them instead of the dc cluster corner/inc
So, you’re going to continue the pattern as follows…
Work 1 dc cluster into every “edge”/ch 1 space AND into the next corner you come across, DO NOT INCREASE (only adding 1 dc cluster), continue working only 1 dc cluster into every ch space until you come to the next corner (the corner directly across from/under the “top” corner) work a dc cluster corner/inc into that “corner”/ch 3 space,
Continue working in every ch space until the end of the round. Sl st into the first st of the round.
Now there are no more “side corners” and only the top & bottom corner/points remain and will be the only ch spaces we will be increasing from here on out.
Fasten off your yarn and grab your next color.
Rnds 8-28: Turn your work. Insert your hook into the closest corner where you previously sl st into to join the rnd and pull through your new yarn color.
Ch 3, work 2 dc in ch space, ch 3 and work 1 dc cluster into same ch space, ch 1 (this is your first dc cluster corner/inc of the rnd).
Work 1 dc cluster into every “edge”/ch 1 space and work a dc cluster corner/inc into every “corner”/ch 3 space
Continue working in every ch space until the end of the round. Sl st into the first st of the round.
You are more than welcome to work more or less rounds for the desired length for your poncho, this is just how many I personally worked 😊.
After that, weave in all your ends and then…
…YOU’RE DONE!
If you recreate the Winifred Poncho, please tag or DM @hayhaycrochet on Instagram so I can see, like and share!
Happy Crocheting~!
I really like this pattern. The yarn I had wouldn’t work for this pattern so I chained a different length at the start and sort of made it up as I went along 😅 I’m not done yet but I’m really happy with the colours I chose and I hope I have enough yarn (I only have 3 skeins…)
Love this poncho!!!
How much yarn do you need to make this?
LOVE LOVE LOVE this pattern. I needed to get rid of some weight 3 yarn that I had, so I chained 80 instead of 64, and completed it with 34 rows. I definitely could have done more rows but my fingers were getting tired 😅
Definitely believe that which you said. Your favorite reason appeared to be at the internet the easiest factor to bear in mind of. I say to you, I definitely get annoyed at the same time as folks think about issues that they just don’t know about. You controlled to hit the nail upon the top as smartly as defined out the whole thing with no need side-effects , people can take a signal. Will probably be again to get more. Thanks
Thanks for your write-up. My spouse and i have usually seen that the majority of people are wanting to lose weight because they wish to show up slim in addition to looking attractive. Nevertheless, they do not usually realize that there are other benefits to losing weight additionally. Doctors state that obese people have problems with a variety of conditions that can be instantly attributed to their particular excess weight. Thankfully that people that are overweight in addition to suffering from diverse diseases can reduce the severity of their particular illnesses by way of losing weight. You’ll be able to see a constant but noted improvement with health whenever even a negligible amount of fat reduction is obtained.
Hello my friend! I want to say that this post is awesome, nice written and include approximately all significant infos. I’d like to see more posts like this.
Please let me know if you’re looking for a article writer for your blog. You have some really good articles and I believe I would be a good asset. If you ever want to take some of the load off, I’d love to write some material for your blog in exchange for a link back to mine. Please blast me an e-mail if interested. Cheers!
Thanks for expressing your ideas in this article. The other issue is that every time a problem occurs with a computer motherboard, people should not go ahead and take risk involving repairing that themselves for if it is not done right it can lead to permanent damage to an entire laptop. It is usually safe just to approach the dealer of your laptop for that repair of motherboard. They’ve technicians who have an skills in dealing with laptop motherboard difficulties and can get the right diagnosis and undertake repairs.
Hello there! Do you know if they make any plugins to help with Search Engine Optimization? I’m trying to get my blog to rank for some targeted keywords but I’m not seeing very good results. If you know of any please share. Cheers!