🤍WELCOME HERE🤍
This post may contain affiliate links.
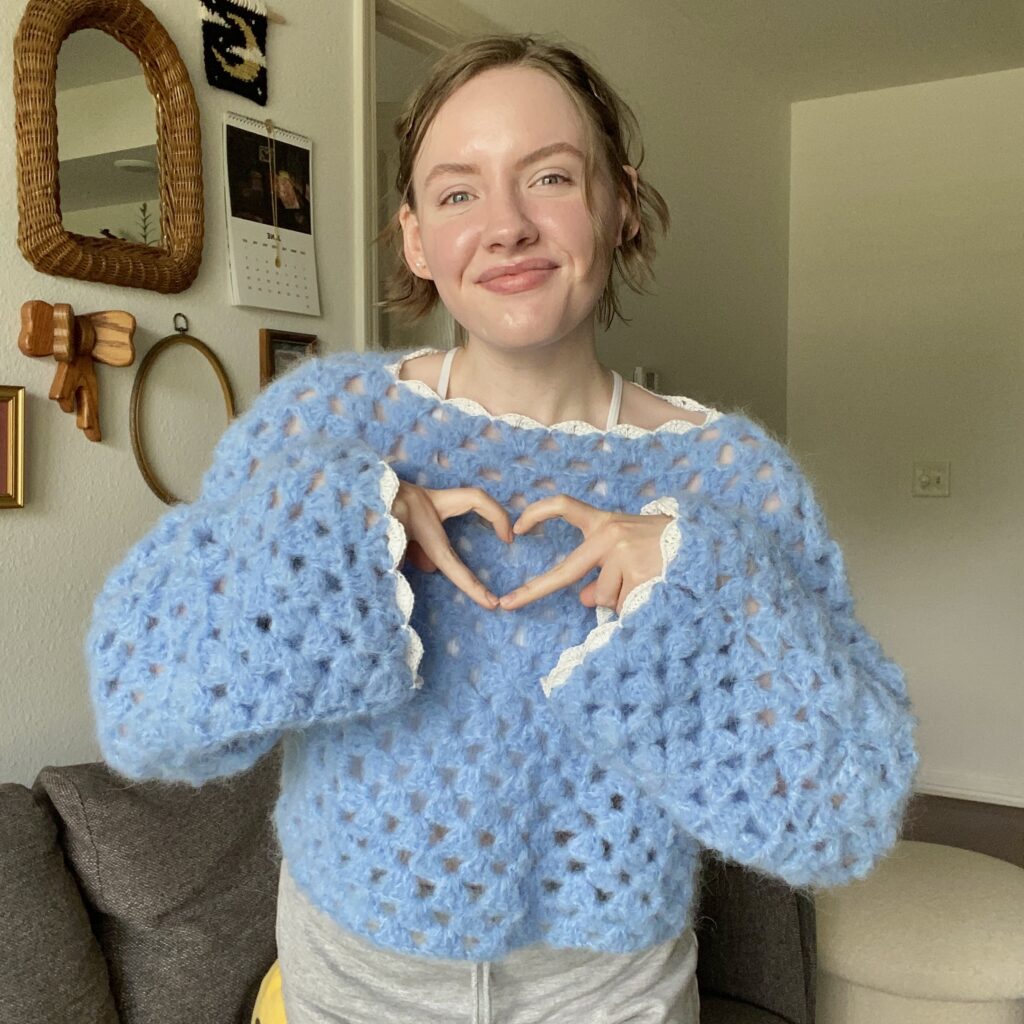
I hope you are well! In todays pattern I am sharing a fun, cozy and simple granny square sweater I like to call “The LaLa Sweater” ☕☁✨
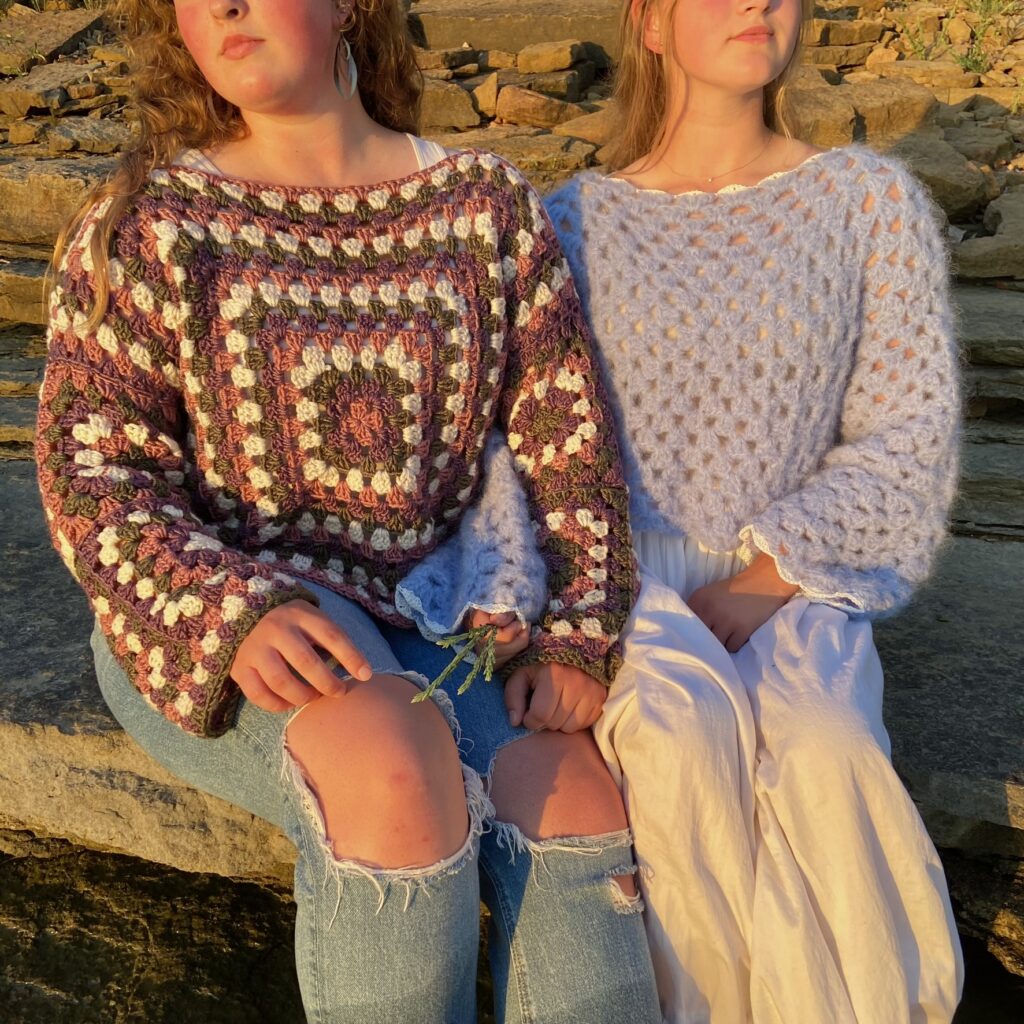
As you may be able to tell from my backlog of patterns I have released, I LOVE granny squares and am always looking for ways I can incorporate them into a new project. I think this sweater is the PERFECT granny square project (one of my personal favs so far) and am already dreaming up 2 more color combos to make this top in.
As with many of my patterns, this sweater can be made with ANY yarn + hook, and of course ANY SIZE (that means gauge doesn’t matter 😉)! How awesome is that???
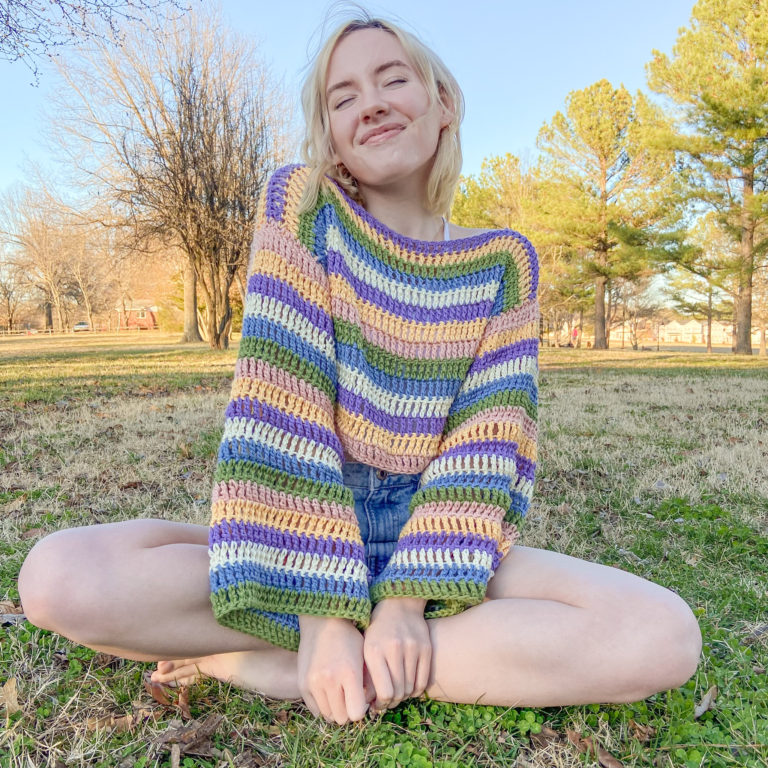
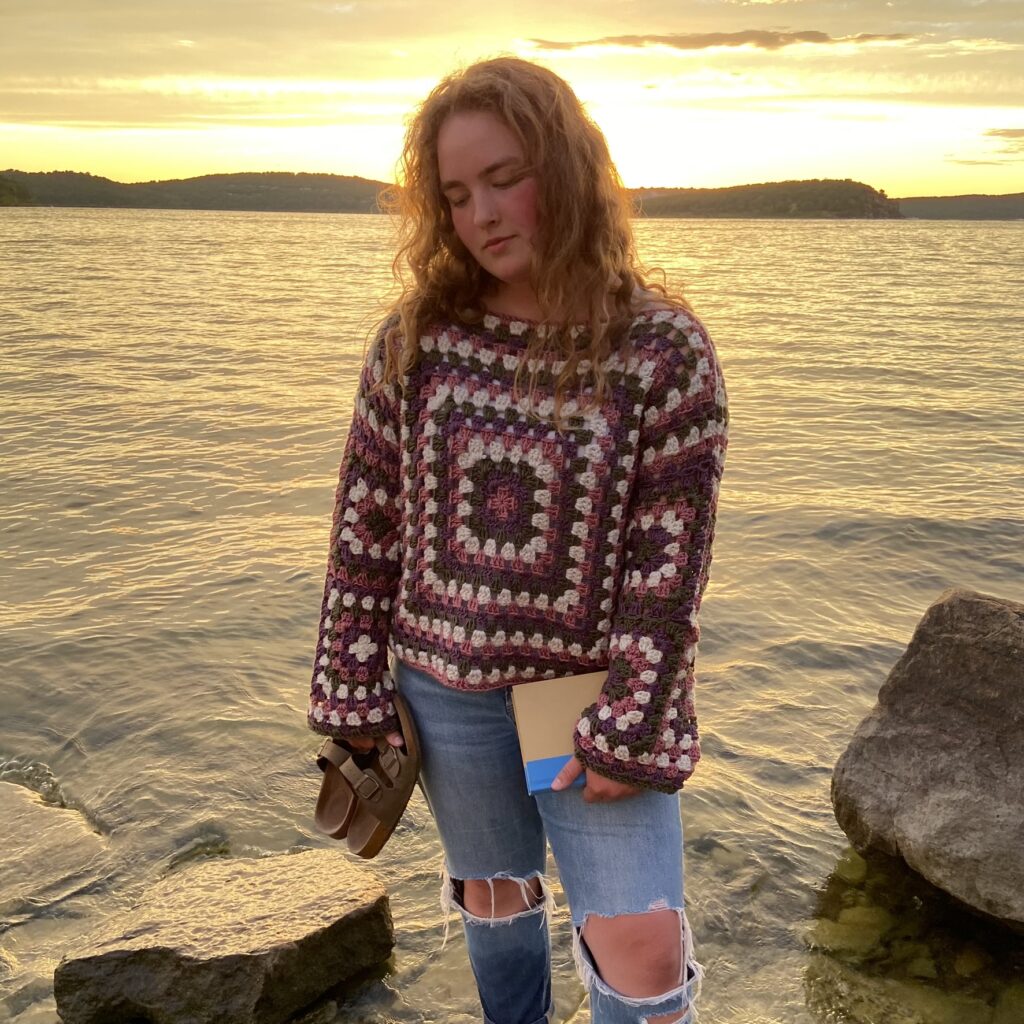
I made 2 that range from sizes S/M to an oversized L/XL, both fit a bit bigger than their actual “sizes” stated, and I think that adds to the overall coziness of the sweaters~💕
Use is as a beach cover-up or just a basic pullover for those chilly nights, its up to YOU since this sweaters sizing is so customizable.
SO, without further ado, LET’S GET STARTED!
Materials
YARN
You can use ANY yarn you’d like since this sweater is so customizable. BUT, if you want a sweater most similar to mine, the yarn I used is…
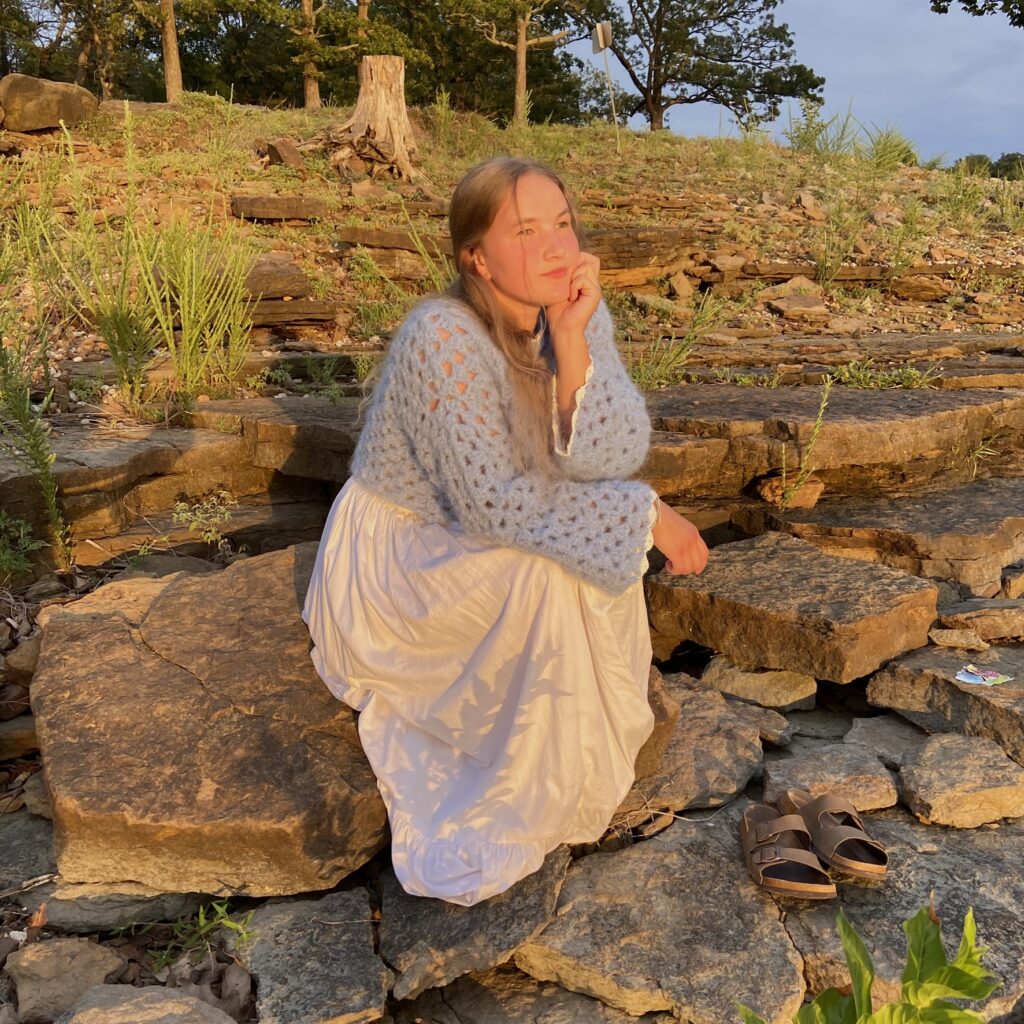
S/M – (in the color “light blue”, I used 4 skeins/approx. 612 yards)
L/XL – (in the colors “Majestic Plum”, “Pearl”, “Moss” and “Hazy Hazel”, I used 8 skeins/approx. 1200 yards)
OPTIONAL WHITE YARN (weight 1 cotton yarn used for the scallop edging on the fluffy blue sweater)
HOOK
Again, you can use whatever crochet hook you desire, but for my sweaters I used…
S/M – 8.0mm Crochet Hook
L/XL – 6.00mm Crochet Hook
Darning Needle (my FAVES!! make seaming and weaving in ends so much easier because of the bent tip)
Stitch markers (The best! They stay in place, so you don’t have to worry about them falling out.)
Stitches + Abbreviations
St(s) = Stitch(es)
Ch = Chain
FTC = * Foundation Turning Ch (tutorial linked)
*I used this in place of a Ch 3 at the beginning of every round, you do not have to do this, its just personal preference.)
Dc = Double Crochet
Sl st = Slip Stitch
Rep = Repeat
Pattern Notes
*This Pattern uses US crochet terms
*Ch 3/FTC ALWAYS counts as a stitch in this pattern.
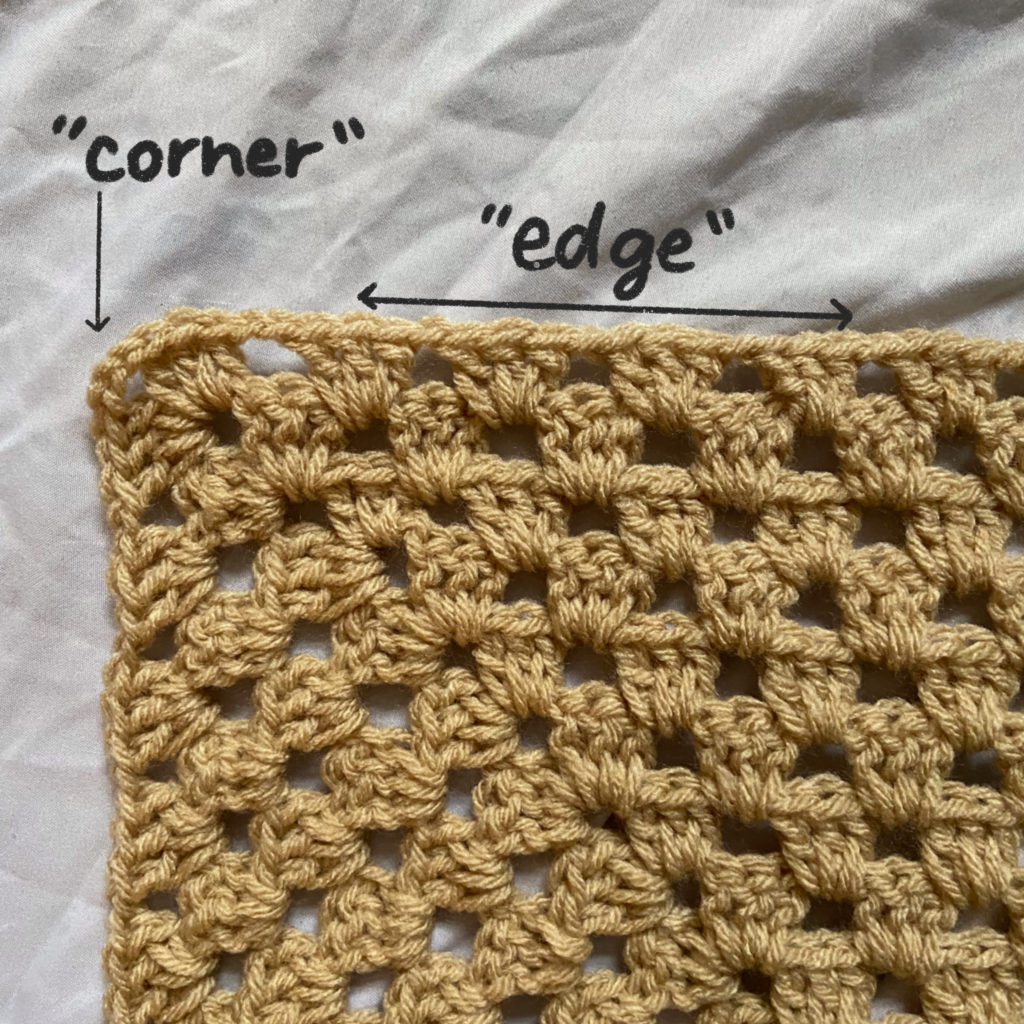
*There are ALWAYS two clusters in every corner, ALWAYS separated by a ‘ch 3‘
*Through the remainder of this pattern, unless otherwise instructed, you will be work in ch spaces and not in sts. (exception for the slip stitch worked to join your round together).
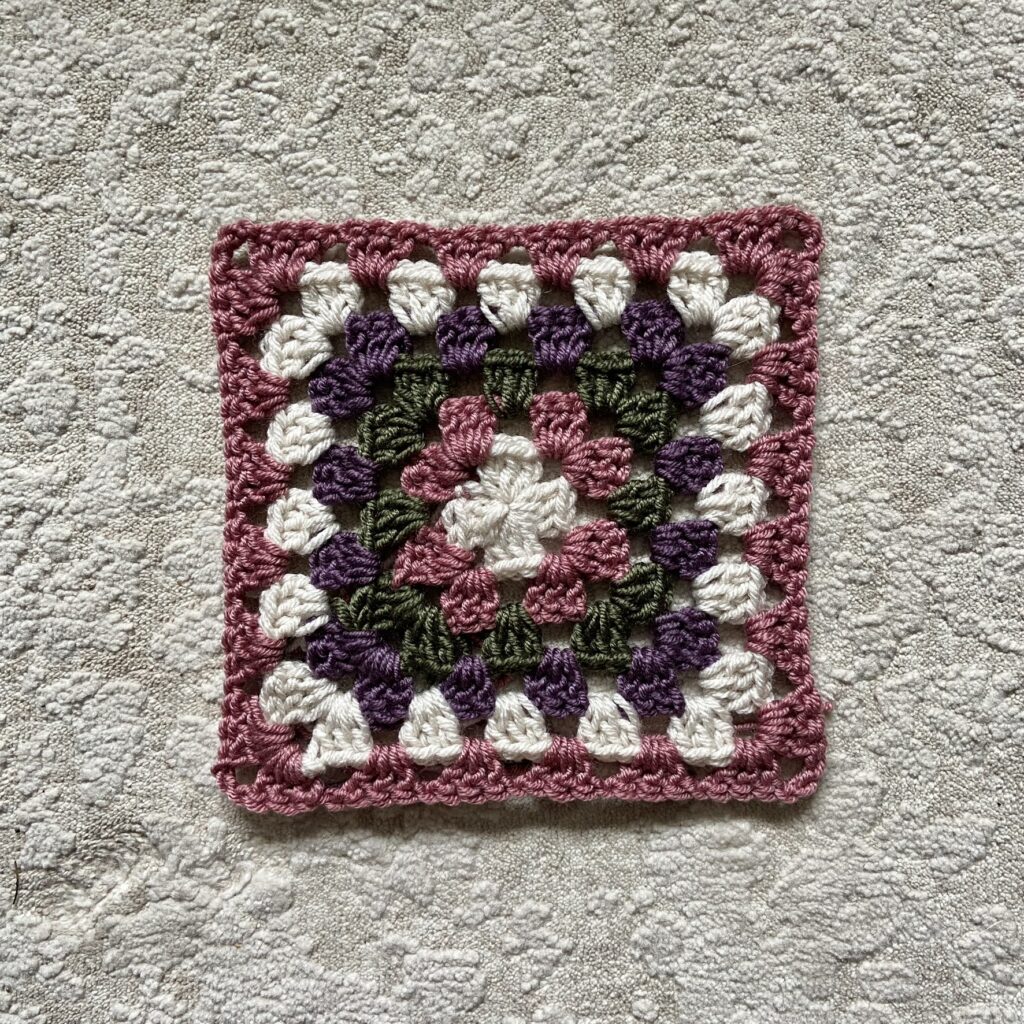
*You will be working a total of 10 squares. 8 small (for sleeves), 2 big (with rows added to sizes to make sweater more rectangular)
The LaLa Sweater Pattern
Sleeve Squares (small squares)
Make a magic ring (tutorial linked).
*The first ch 3/stacked sc/FTC of each round ALWAYS counts as a st/dc)
Rnd 1: Ch 3 (or FTC as I did for the first st of every row in my Video Tutorial), work 2 dc in MR, ch 3, *work 3 dc in MR, ch 3, *rep 2 more times. Sl st into the first st of the round. <4 clusters total>
*3 dc worked into the same ch space is referred to as a cluster
*If changing colors, before you finish off the slip stitch, pull through your new color instead of the color you were previously using
Rnd 2: Turn your work. Ch 3 (or FTC), work 2 dc in ch space, ch 3 and work 1 cluster into same ch space. ch 1, *work 1 cluster, ch 3, work cluster into same ch space. ch 1, *rep until the end of the round. Sl st into the first st of the round (change your color before finishing the slip stitch if you are doing multiple colors).
*always ch 1 before you move on the the next ch space.
Rnd 3: Turn your work. Ch 3, dc 2, ch 1, when you come to one of the 4 corners in your project work 2 clusters in the corner (“2 clusters in the corner” will always consist of 1 cluster, ch 3, 1 cluster worked in the same ch space to create a corner), ch 1, *work 1 cluster, ch 1, work 2 clusters in the corner, ch 1, *rep until the end of the round. Sl st into the first st of the round.
Video tutorial available here if you need better help visualizing the process!
Rnd 4: Turn your work. Ch 3, 2 dc, ch 1, work 2 clusters in corner, ch 1, *work 1 cluster, ch 1, work 1 cluster, ch 1, work 2 clusters in the corner, ch 1, *rep until the end of the round. Sl st into the first st of the round.
Rnd 5: Turn your work. Ch 3, dc 2, ch 1, work 1 cluster, ch 1, work 2 clusters in the corner, ch 1, *work 1 cluster, ch 1, work 1 cluster, ch 1, work 1 cluster, ch 1, work 2 clusters in the corner, ch 1, *rep until the end of the round. Sl st into the first st of the round.
Rnd 6: Turn your work. Ch 3, 2 dc, ch 1, work 1 cluster, ch 1, work 2 clusters in the corner, ch 1, *work 1 cluster, ch 1, work 1 cluster, ch 1, work 1 cluster, ch 1, work 1 cluster, ch 1, work 2 clusters, ch 1, *rep until the end of the round. Sl st into the first st of the round.
You will repeat this pattern (1 cluster in every “edge” ch space and 2 clusters in every “corner” ch space) until you have the number of rounds you need for your sleeve squares! (more about sleeve squares below)
Each corner set of clusters will increase your number of clusters in each round, this is how your square grows!
I stopped at 5 rounds for the S/M (blue sweater) and stopped at 6 rounds for the L/XL (multicolor sweater).
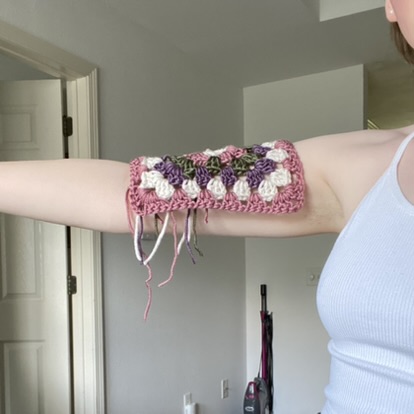
You can make these squares however big you’d like. Again, I made mine oversized, but if you need to help gauging if your squares will be big/wide enough for your arm its very simple! All you have to do is-
–Make a square as big as you think you might need it and see that it covers over half of the widest part of your arm (pictured below). If it doesn’t, work a round or so more. If it does, then perfect! Make 7 more squares JUST like it, until you have 8 in total.
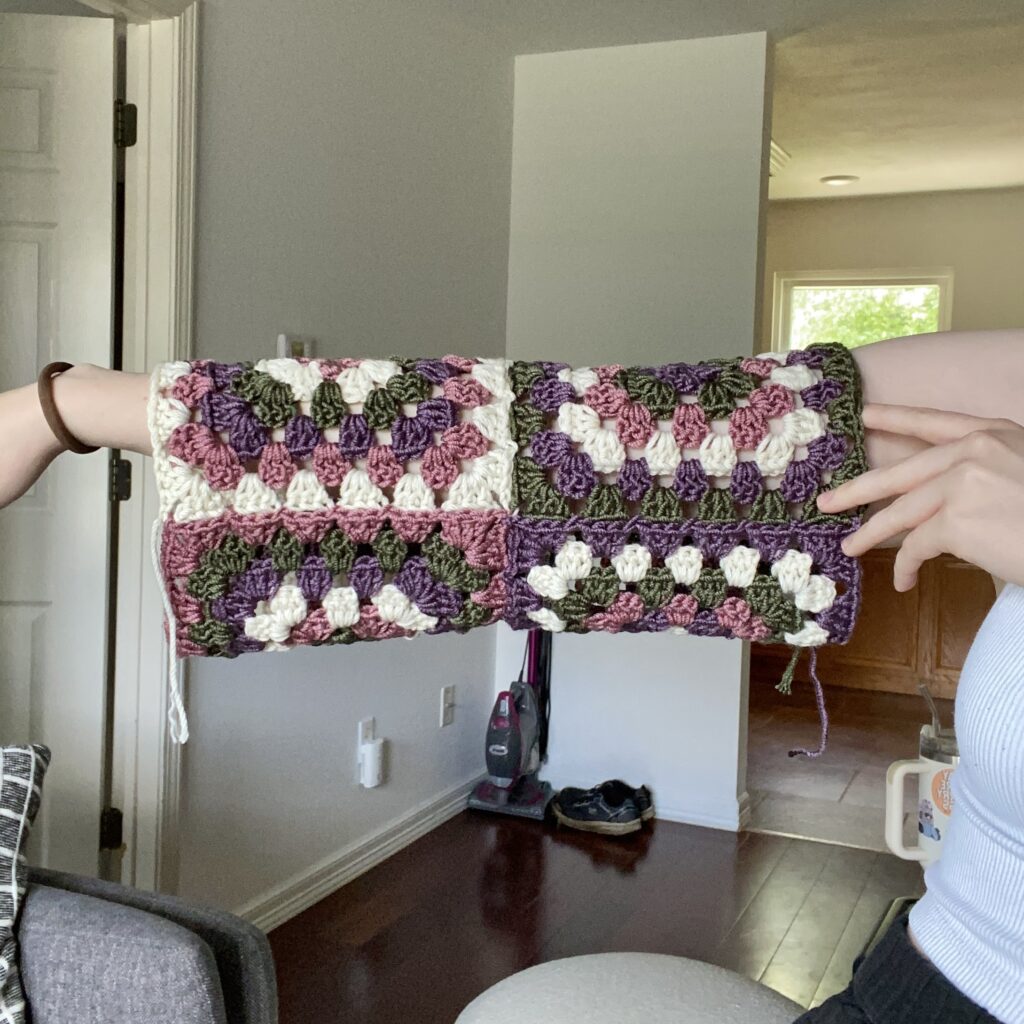
After you have all your sleeve squares, divide them into 2 piles (4 squares per sleeve) and seam them together in a sleeve shape (rectangle shape) with whatever seaming method you’d like! (finished sleeve pictured below) I used the join as you go method (tutorial linked).
Front and Back Squares (big squares)
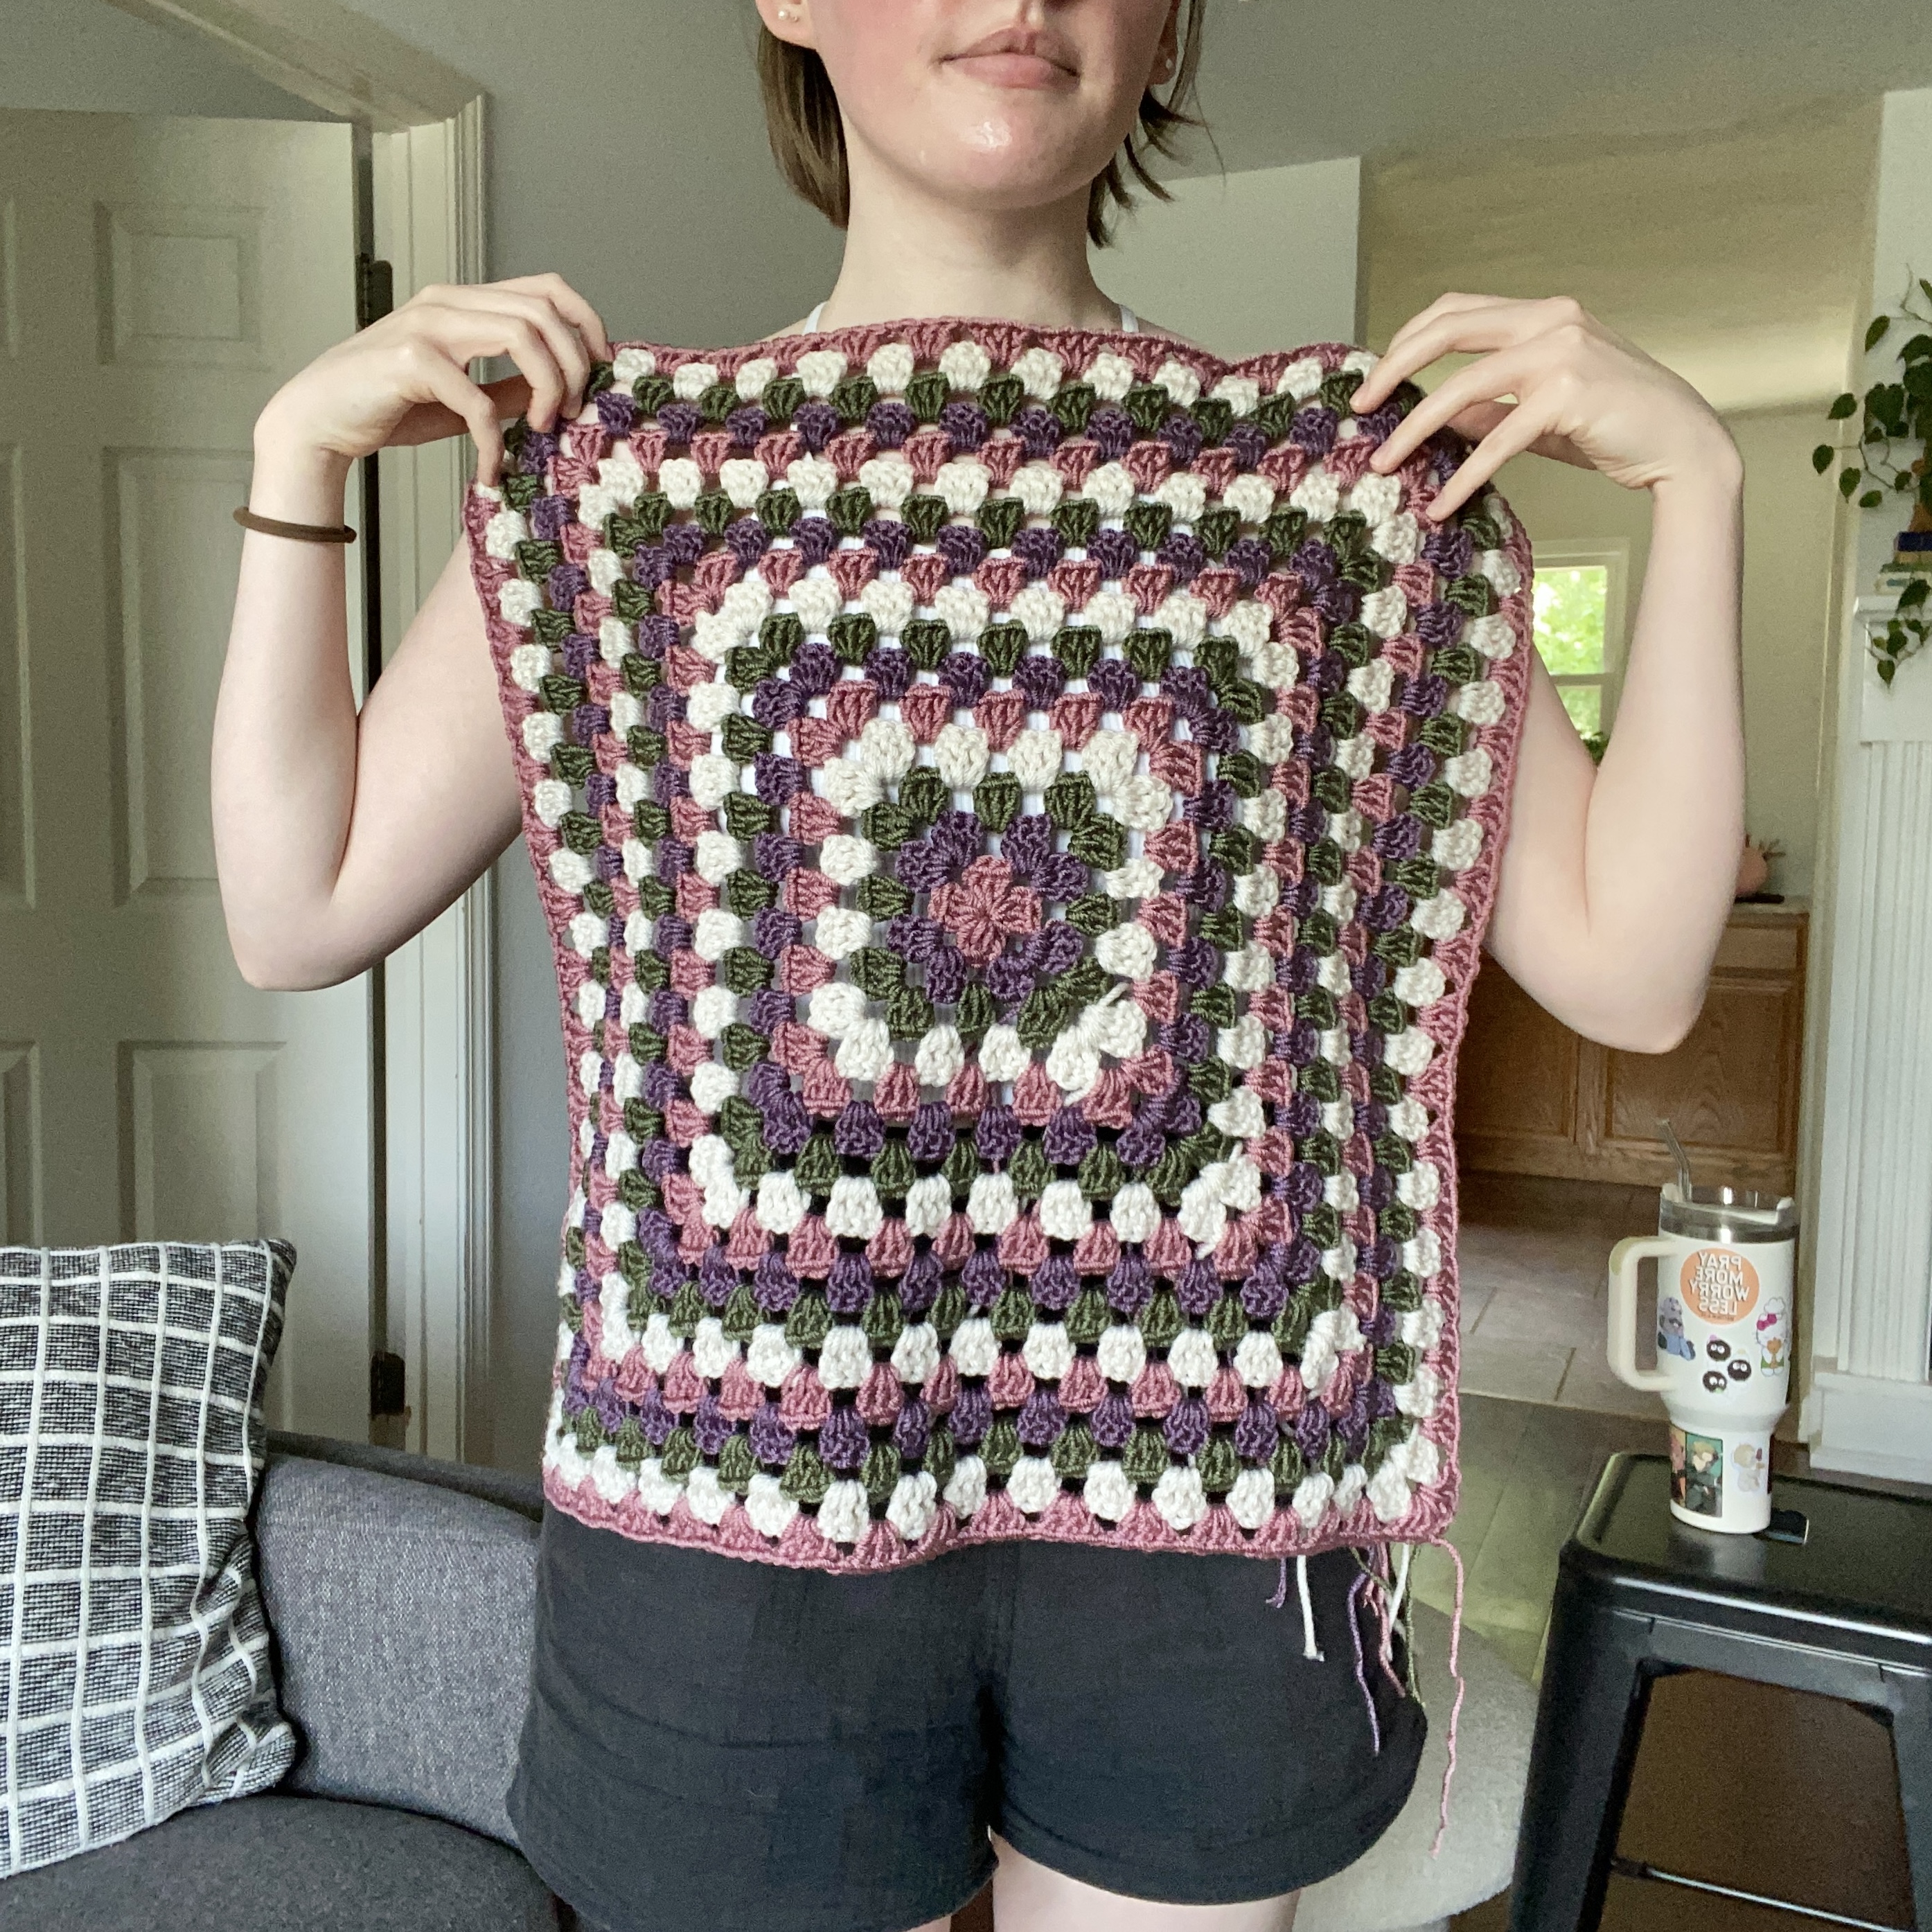
Okay, now we’re going to make 2 fairly big granny squares using the same granny square making method as before.
I stopped at 10 rounds for the S/M (blue sweater) and stopped at 17 rounds for the L/XL (multicolor sweater).
Don’t worry that width of the square does not cover much surface area across your chest/shoulders because I’ll show you how to add to that later on in the pattern. Right now were looking for the length of the square that works best for you.
Hold the top corners of your square up to you, where the top of your shoulders/collarbone is. See if the bottom of the square hits a good length to where you might want it.
My S/M (10 rnds) square hit just below my belly button and my L/XL (17 rnds) square hit just below my hip bones (example pictured below).
Adding Width to your Front and Back Squares
This part of the pattern may be optional depending on how big you made your front and back squares. If your squares are perfect length and width for you overall (like if your square covers across your chest and shoulders, giving you a good drop shoulder as you want it to) you can skip this step. BUT if you want your square wider (not longer) and need more of a drop shoulder fit for your sweater to fit and lay more effortlessly, then this section of the pattern is for YOU!
To start, attach your yarn to a corner (all sides are identical) and now you will be working in rows instead of rounds.
Row 1: Ch 3/FTC, work 2 more dc into that same ch space (This is your first dc cluster of the row. There will be NO cluster corners in these rows), now continue working the normal clusters/granny stitches along the one side of your square.
*if changing colors, before finishing your last dc (pulling through the last 2 loops) drop your old color and pull through your new color.
Row 2: Turn your work. Ch 4/FTC, ch 1, (the extra ch is for moving on to the next cluster), work the normal clusters/granny stitches until the end of the row. At the end of the row when you run out of ch spaces, ch 1 and work 1 dc into the corner/the very last st/dc from the previous row.
Repeat Rows 1 & 2 until you have as many rows as you want for the width square on one side. You can continually hold it up to you after each row to get a feel for how many you want and where the side will generally fall.
REPEAT how ever many rows you worked to the OPPOSITE side of your square.
REPEAT process for second square.
I stopped at 4 rows for the S/M on each side (blue sweater) and stopped at 5 rows for the L/XL on each side (multicolor sweater).
Check out my Tutorial HERE if you are having trouble with how to visualize and do this.
Seaming
Seam your sleeves, front and back panels all together using whatever seaming method you’d like! I used “Invisible Seam” (tutorial linked here).
Adding Length to the Sleeves
This part is optional, only if your sleeves are too short for your liking. The ‘blue sweater’ I did not add any extra length, but for the ‘multicolor sweater’ I did add 4 extra rnds (because I was giving it to a friend who had longer arms than me).
Attach yarn to the end of your sleeve.
Rnd 1: Ch 3/FTC, work 2 more dc into that same ch space. Work the dc clusters/granny stitches into each ch space until the end of the rnd (no increases). Sl st into the first st of the rnd.
Repeat Rnd 1 (turning your work after every rnd) until the sleeve is to your desired length.
I worked 0 rnds for the S/M (blue sweater) and worked 4 extra rnds for the L/XL (multicolor sweater)
Scallop Edging
This scallop detailing is optional if it is not your vibe. BUT if do you like it, please refer to my tutorial for this pattern, as I feel like I explain it much better there than I can write it here. The timestamps in the video will make it super easy and convenient to find!
Weave in all your ends and then…
…YOU’RE DONE!
If you recreate “The LaLa Sweater”, please tag or DM @hayhaycrochet on Instagram so I can see, like and share!
Happy Crocheting~!